
Salads
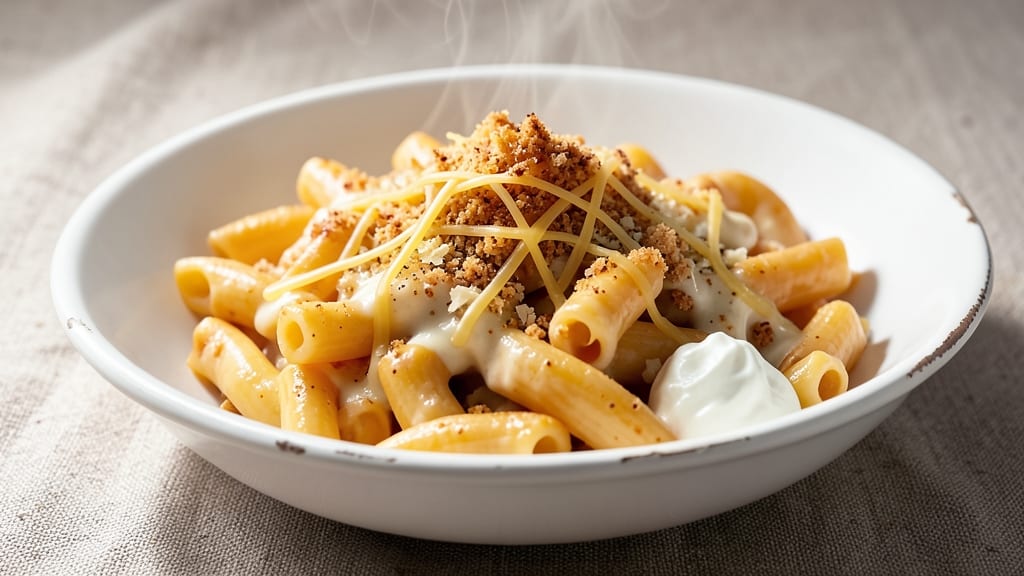
This ultra-creamy Barilla elbow pasta mac and cheese delivers the kind of rich, velvety texture that turns simple comfort food into a showstopper. The secret lies in a proper roux base—equal parts butter and flour cooked until golden—that creates a sauce thick enough to cling to every noodle without breaking.
I’ve perfected this recipe over years of trial (and a few burnt batches), and it’s now the one my family demands whenever we crave something indulgent yet satisfying.
The foolproof method starts with cooking Barilla elbows to al dente perfection, then tossing them in the cheese sauce while still hot. This ensures each bite is coated in a luxurious blend of sharp cheddar, creamy Gruyère, and a touch of cream cheese for that signature melt.
For extra depth, I brown crispy bacon first—its smoky flavor cuts through the richness while adding a satisfying crunch. No fancy equipment or techniques required, just patience and attention to the roux.
What you’ll end up with is a restaurant-quality dish that’s golden on top, creamy in the middle, and packed with flavor in every forkful. The sauce stays velvety even when reheated, and the pasta maintains its bite without turning mushy.
This version works just as well as a weeknight dinner or a crowd-pleasing holiday side—though I won’t judge if you eat the whole pan straight from the oven.
For those who prefer a lighter touch, swap half the cheddar for Monterey Jack or add a splash of milk for extra smoothness. The possibilities are endless, but the foundation—creamy, cheesy, and utterly addictive—remains the same. Let’s get cooking!
Ingredients for barilla pasta mac and cheese
These 14 ingredients transform simple pantry staples into restaurant-quality creamy Barilla mac and cheese.
| Ingredient | Amount | Notes |
|---|---|---|
| Barilla Elbow Pasta 🍝 | 12 oz | Cooked al dente, reserved |
| Unsalted Butter 🧈 | ½ cup | Cold, cut into pieces |
| All-Purpose Flour 🌾 | ½ cup | For golden roux |
| Sharp Cheddar Cheese 🧀 | 2 cups | Shredded, aged 6+ months |
| Gruyère Cheese 🧀 | ¾ cup | Shredded, nutty flavor |
| Cream Cheese 🧀 | 4 oz | Softened, full-fat preferred |
| Heavy Cream 🥛 | ½ cup | Full-fat for richness |
| Crispy Bacon 🥓 | 4 oz | Chopped, cooked until crisp |
| Garlic Cloves 🧄 | 2 cloves | Minced, for roux depth |
| Yellow Onion 🧅 | ½ whole | Diced, for roux |
| Salt 🧂 | 1 ½ tsp | Kosher or sea salt |
| Ground Black Pepper 🌶️ | ½ tsp | Freshly ground |
| Panko Breadcrumbs 🍞 | ¼ cup | For crispy topping |
| Extra-Virgin Olive Oil 🫒 | 1 tbsp | For drizzling on top |
The cheeses are non-negotiable here. Sharp cheddar brings the tang, while Gruyère adds that signature nutty depth—Kraft or store-brand won't cut it. I grab mine from the cheese counter at Whole Foods or Trader Joe's (their aged cheddar is a game-changer). For the cream cheese, Philadelphia is the gold standard—nothing else melts as smoothly. The bacon? Thick-cut from Costco gives you the best crisp, but any good-quality bacon works. Pro tip: Cook it first so you don't burn your roux later.
No sharp cheddar? Monterey Jack works in a pinch, though it lacks that bold flavor. Gruyère too pricey? Parmesan at half the amount adds umami. The roux is where magic happens—never rush it. Butter should foam, then turn golden brown before adding flour. That nutty aroma means you're doing it right. For the pasta, Barilla elbows are ideal, but any elbow shape works. Just don't overcook—al dente is key so it doesn't turn mushy in the sauce.
This reheats beautifully—just add a splash of milk if it gets too thick. Keeps 4-5 days in the fridge, freezes for 3 months. I always make extra because it's the kind of dish that disappears fast. For serving, I drizzle with olive oil and sprinkle extra breadcrumbs for crunch. Leftovers? Even better the next day as the flavors meld.
Why You'll Love This Recipe
- One-Pot Magic: I swear by this recipe because it’s the only mac and cheese that doesn’t leave me scrubbing three pots later. Barilla elbows cook fast—no mushy edges, no waiting—while the roux builds right in the same pot. Honestly, I’ve made it on nights when I forgot to thaw dinner, and it still comes out creamy and perfect.
- Cheese Love Bomb: That Gruyère melts into something buttery and sharp, while the cheddar adds that classic tang. The trick? Low and slow heat—no lumps, just a velvety sauce that clings to every noodle. (Yes, even on a Tuesday night.)
- Lunchbox Hero: Between us, this is my go-to for meal prep. The elbows hold their shape when cold, and the cheese sauce stays rich enough to reheat without turning greasy. Pack it for work, freeze portions for sick days—it’s the ultimate “I don’t have to think” meal.
- Budget Stretch: Sharp cheddar and Gruyère might sound fancy, but they stretch further than you’d think. A block of each goes a long way, and the butter/flour roux feels indulgent without breaking the bank. Plus, leftovers? They’re the best kind—reheated in minutes, still creamy, still crave-worthy.
Step-by-step instructions for Barilla pasta mac and cheese
Here's how to create the creamiest, most indulgent elbow mac and cheese you've ever tasted.
Cook the Pasta Perfectly Al Dente
Bring a large pot of water to a rolling boil and add 12 oz Barilla elbow pasta. Salt the water generously—it should taste like the sea. Cook the pasta 1 minute less than the package instructions for al dente texture. This ensures it finishes cooking in the cheese sauce without becoming mushy.
While the pasta cooks, I like to save 1 cup of pasta water before draining. This starchy liquid is liquid gold for creating a silky sauce later. Drain the pasta and set it aside—don't rinse it, as the starch helps the cheese cling beautifully. The pasta should be tender but still have a slight bite when you press it between your fingers.
Build the Ultimate Roux for Creamy Base
In a large, heavy-bottomed pot, melt 0.5 cup unsalted butter over medium heat. Add the 0.5 whole yellow onion and 2 cloves garlic cloves (minced), cooking until soft and translucent—about 3-4 minutes. This step develops the flavor foundation.
Next, whisk in 0.5 cup all-purpose flour to create a roux. Cook this mixture, stirring constantly, for 2-3 minutes until it turns a light golden color. This golden roux is what transforms ordinary mac and cheese into something extraordinary—it's the secret to that velvety texture. Don't walk away; you want it to cook just until it's golden but not browned.
Create the Dreamy Cheese Sauce
Slowly pour in 0.5 cup heavy cream while whisking continuously to prevent lumps. Let the mixture simmer for 2 minutes until slightly thickened. Then, gradually add 2 cups sharp cheddar cheese and 0.75 cup gruyère cheese, stirring until completely melted and smooth.
Here's where the magic happens: reduce heat to low and stir in 4 oz cream cheese and 4 oz crispy bacon. The cream cheese adds richness while the bacon brings smoky depth. Let everything melt together completely, about 3-4 minutes. You'll know it's perfect when the sauce is silky and coats the back of a spoon. If it's too thick, add 2-3 tablespoons of reserved pasta water to reach your desired consistency.
Combine and Finish with Crispy Topping
Add the cooked pasta to the cheese sauce and stir gently to coat every noodle. The sauce should cling beautifully to the pasta, creating that classic mac and cheese effect. Season with 1.5 tsp salt and 0.5 tsp ground black pepper, tasting as you go. Remember, you can always add more salt later if needed.
For that perfect crispy topping, spread 0.25 cup panko breadcrumbs evenly over the top of the mac and cheese. Drizzle with 1 tbsp extra-virgin olive oil and broil for 2-3 minutes until golden brown. Watch it closely—you want that beautiful contrast of creamy sauce with crispy breadcrumbs on top. The moment it's golden, remove from the oven immediately.
Rest and Serve for Maximum Creaminess
Let the mac and cheese rest for 5 minutes before serving. This might seem counterintuitive, but it allows the sauce to fully set and the flavors to meld together. The pasta will absorb some of the sauce, making each bite even creamier.
Serve immediately with a side salad or steamed vegetables. The contrast of the crispy breadcrumb topping against the ultra-creamy cheese sauce makes this mac and cheese truly unforgettable. Each bite delivers that perfect balance of cheesy richness, smoky bacon flavor, and buttery, crispy contrast.
Pro Tips For Making Barilla Pasta Mac And Cheese
- Cook pasta al dente: Barilla elbows need that perfect bite—test them one minute early (they keep cooking in the sauce). Taste one piece: it should have a slight resistance, not be mushy. I learned this the hard way after serving rubbery pasta that made my guests wince.
- Grate cheese aggressively: Sharp cheddar and Gruyère melt differently—shred the cheddar fine, but grate the Gruyère into rice-sized pieces. The Gruyère’s fat needs to distribute evenly, and pre-shredded cheese (ugh) just won’t cut it. Sounds weird, but it works: your sauce won’t separate, and the texture stays velvety.
- Low and slow roux: Whisk that butter-flour mix over medium-low heat until it’s a pale gold, not brown. I used to rush it, and the flour would taste raw or burn. If it smells nutty, you’ve gone too far—start over. Patience here guarantees a creamy sauce, not a gluey one.
- Reserve pasta water: Drain the cooked pasta, but keep a cup of starchy water nearby. When you stir the cheese into the sauce, add splashes of this water to loosen it up—it’s better than milk for binding. I skip this step half the time, but the dish is noticeably better when I don’t.
Make-ahead tips for barilla pasta mac and cheese
Prep Ahead Strategy
Make the cheese sauce up to 2 days ahead and store it in an airtight container in the fridge. The flavors deepen as the cheeses meld, and you won’t have to rush on serving day.
Just reheat gently over low heat with a splash of milk or pasta water to restore creaminess. I always make the sauce first because it’s the most time-consuming part. 🧀
Pasta Prep Shortcut
Cook the pasta 1 day ahead and store it in the fridge in its cooking water (covered). When ready to serve, drain and toss with a little olive oil to prevent sticking.
This trick saves you from boiling pasta last-minute and keeps it perfectly al dente. Just add it straight to the reheated sauce when ready to serve.
Bacon Prep Tip
Cook all the bacon you’ll need for the recipe at once and store it in the fridge. Use it within 3 days for best flavor and texture. I like to chop it into small pieces and store it in a sealed container.
This way, you can quickly add it to the sauce when reheating without extra cooking steps. 🥓
Freezer-Friendly Assembly
Assemble the entire mac and cheese (without the breadcrumb topping) in a freezer-safe container. Freeze for up to 3 months. When ready to serve, thaw overnight in the fridge, then reheat in a skillet with 2 tbsp milk or pasta water until warmed through.
Add the crispy topping fresh from the oven for that restaurant-quality finish.
Make-Ahead Serving Hack
For potlucks or gatherings, prepare the mac and cheese in a 9x13-inch baking dish and refrigerate it assembled (with topping). When ready to serve, bake at 375°F for 20-25 minutes until bubbly and golden.
This method keeps everything cohesive and ensures the crispy topping stays perfect. Just don’t forget to broil it for that final golden touch!
Reheating Leftovers
Leftovers reheat beautifully in the microwave or on the stovetop. For microwave reheating, cover with a damp paper towel and heat in 1-minute intervals at 50% power until warmed through.
For stovetop reheating, add 2 tbsp milk or pasta water to prevent drying out. Stir frequently to maintain that creamy texture. 💫
Nutrition facts
Frequently asked questions
Can I use a different pasta shape instead of Barilla elbows?
While Barilla elbows work perfectly, any medium-sized pasta like penne, fusilli, or farfalle will work. Just ensure the shape has crevices to hold the cheese sauce. For a more rustic texture, try cavatappi or rigatoni. The key is to cook it 1 minute less than package instructions to maintain al dente texture when combined with the sauce.
Why did my cheese sauce turn grainy?
Grainy sauce usually happens from one of three things: adding cheese too quickly, not enough liquid, or not stirring constantly. Always melt cheese low and slow while whisking vigorously. If it starts to separate, add 1-2 tablespoons of pasta water or milk to restore creaminess. For extra smoothness, strain the sauce through a fine-mesh sieve before adding the pasta.
How can I make this recipe vegetarian?
Swap the bacon for crispy roasted mushrooms or smoked paprika for depth. Use vegetable broth instead of water for cooking pasta, and add 1/2 cup nutritional yeast to the cheese sauce for a cheesy, umami boost. For extra richness, stir in 1/4 cup vegan cream cheese or cashew cream. The texture will be just as velvety!
Can I make this mac and cheese without baking?
Yes! For a stovetop version, simply combine all ingredients (except breadcrumbs) in a large pot over low heat, stirring constantly until fully melted and creamy. If it's too thick, add 1/2 cup milk or pasta water. For a crispy topping, sprinkle panko breadcrumbs on top and broil for 2-3 minutes until golden. The result is just as delicious without the oven step.
What's the best way to reheat leftovers?
For creamiest results, reheat on the stovetop over low heat with 2-3 tablespoons of milk or pasta water to restore moisture. If using the microwave, cover with a damp paper towel and heat in 30-second intervals at 50% power, stirring between each interval. Never reheat in the oven uncovered—it will dry out. For best texture, add fresh breadcrumbs on top when serving.