
Breakfast & Brunch
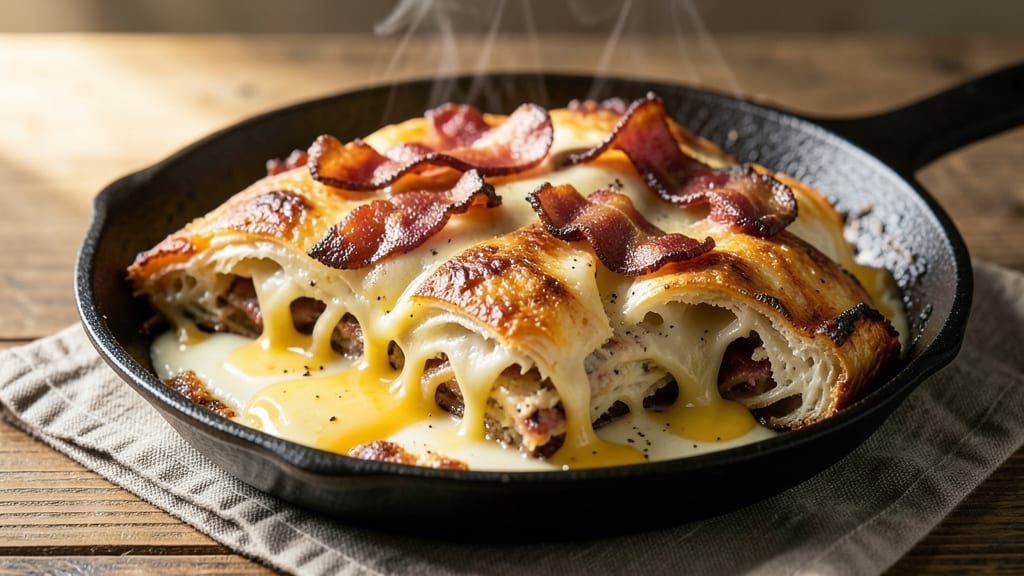
This bacon cheese pull-apart recipe delivers the ultimate comfort food experience—golden, crispy layers that shatter into gooey, cheesy strands with every bite. 🔥 The secret lies in a perfectly balanced dough that bakes up flaky yet sturdy enough to hold its shape, topped with a savory blend of melted cheese and crispy bacon that transforms ordinary brunch into an unforgettable centerpiece.
I developed this recipe after years of testing, ensuring the cheese pulls cleanly while the bacon stays perfectly crisp.
The foundation starts with a simple dough that requires minimal effort but yields maximum results—no yeast, no fuss, just a foolproof combination of flour, butter, and a touch of baking powder for that signature pull-apart texture.
Once baked, the golden crust gives way to a creamy, cheesy interior, while the bacon adds a smoky, salty contrast that makes every bite irresistible. This dish is designed to impress, whether you're serving it as a brunch centerpiece, appetizer, or even a hearty side.
What makes this recipe truly special is the way the cheese melts into perfect strings, creating that satisfying "pull" that keeps everyone reaching for seconds. The bacon, cooked until crispy, adds a textural and flavorful element that elevates the dish from ordinary to extraordinary.
With just a few simple ingredients and a little patience, you'll achieve restaurant-quality results that taste even better than takeout.
Perfect for feeding a crowd or enjoying as a cozy weekend treat, this bacon cheese pull-apart dish is versatile enough to adapt to any occasion. Whether you're hosting a brunch, game day, or just craving a satisfying meal, this recipe delivers on flavor, texture, and ease.
Let's get started on creating something that will become a household favorite.
Ingredients for bacon cheese pull apart
Twelve ingredients, zero yeast—just pure, crispy, cheesy pull-apart magic for your crowd.
| Ingredient | Amount | Notes |
|---|---|---|
| All-Purpose Flour 🌾 | 4 cups | Sifted for flaky texture |
| Unsalted Butter 🧈 | 1 cup | Cold, cubed for even baking |
| Baking Powder 🧂 | 1 tbsp | Aluminum-free for best rise |
| Salt 🧂 | 1 tsp | Kosher or sea salt |
| Heavy Cream 🥛 | 1 cup | Cold for flaky layers |
| Sharp Cheddar Cheese 🧀 | 2 cups | Shredded, sharp variety |
| Pepper Jack Cheese 🧀 | 1 cup | Shredded, for spicy kick |
| Bacon 🥓 | 1 ½ lb | Thick-cut, cooked crispy |
| Garlic Powder 🧄 | 1 tsp | For extra savory depth |
| Onion Powder 🧅 | 1 tsp | Enhances cheesy flavor |
| Ground Black Pepper 🌶️ | ½ tsp | Freshly cracked for heat |
| Butterflake Seasoning 🧂 | 1 tbsp | Optional for extra flavor |
The bacon is non-negotiable here—thick-cut is key for that perfect crispy texture. Oscar Mayer or Costco Kirkland are my go-tos, but any brand works as long as it's thick. Cook it until it's golden and crispy—no sad, limp bacon here! The cheeses? Sharp cheddar and pepper jack give you that perfect balance of tangy and spicy, but Monterey Jack works too if you prefer milder flavor. Pre-shredded cheese has anti-caking agents, so I always grate my own from a block—it makes all the difference in that pull-apart perfection.
No baking powder? Self-rising flour at 1 cup plus 1 tsp baking powder gets you close. Short on sharp cheddar? Parmesan mixed in at the end adds depth. The dough needs to be cold when you mix it—chill the butter and cream for 30 minutes before combining. For the bacon, I like to cook it ahead and store it in the fridge until ready to use. That way, you don't have to deal with grease splatter while the dough is resting. And if you're feeling fancy, add a sprinkle of smoked paprika to the cheese mix for extra smokiness.
This dough keeps for 2 days in the fridge, wrapped tightly in plastic. The fully assembled dish? 3 days max—the bacon gets soggy if you wait too long. For make-ahead genius, bake it, cool completely, then freeze. Reheats beautifully in a 350°F oven for 10-15 minutes until golden and bubbly. I always make a double batch—one for the table, one for leftovers. Trust me, it disappears fast.
Why You'll Love This Recipe
- No-Measurement Guessing: Mix the dough until it just holds together—no food scale, no stress. Heavy cream and butter make it forgiving, so even if I eyeball the flour, it still comes out tender and pull-apart perfect.
- Crispy-Creamy Magic: That first bite? Crunchy bacon edges give way to a buttery, slightly chewy center—like a hug from a breakfast casserole. The baking powder gives it a lift without tasting like a box mix.
- Party in a Pan: Serve it warm for brunch with coffee, cut into squares for game day, or pack slices for lunch. Honestly, I’ve reheated leftovers straight from the fridge and no one ever complains—it’s that good.
- Budget Breakfast Win: Flour, butter, and cream are pantry staples, and bacon adds richness without breaking the bank. Make a double batch, freeze half, and you’ve got a week’s worth of easy, satisfying meals for less than takeout.
Step-by-step instructions for bacon cheese pull apart
Here's how to make layers so crispy they'll shatter at every pull—no baking skills required!
🍳 Step 1: Cook the Bacon to Crispy Perfection
Start by lining a baking sheet with parchment paper and arranging the 1.5 lb bacon in a single layer. Place it in a 400°F oven for 20-25 minutes until the edges are deep golden brown and the fat has rendered out completely. Watch closely after 15 minutes—you want crispy, not burnt.
Once done, transfer the bacon to a paper towel-lined plate and let it cool for 5 minutes. Then, use a fork to chop it into ¼-inch pieces—you'll want to preserve that crispy texture. Set aside ½ cup of the bacon fat (discard the rest) for later use. This fat is pure flavor gold that'll make your pull-apart extra rich.
👨🍳 Step 2: Mix the Dry Ingredients for Flaky Layers
In a large bowl, whisk together the 4 cups all-purpose flour, 1 tbsp baking powder, 1 tsp salt, 1 tsp garlic powder, 1 tsp onion powder, and 0.5 tsp ground black pepper. Sift the flour first for that perfect flaky texture—don't skip this! Add the 1 tbsp butterflake seasoning (if using) and mix until evenly distributed.
Create a well in the center and add the 1 cup cold, cubed unsalted butter. Use your fingers or a pastry cutter to work the butter into the flour until the mixture resembles coarse crumbs with pea-sized butter pieces still visible. Overworking here will make your pull-apart tough instead of tender. Keep everything cold—this is key for those crispy layers!
🥘 Step 3: Combine Wet Ingredients for Maximum Flavor
In a separate bowl, mix the 1 cup cold heavy cream, 2 cups shredded sharp cheddar cheese, and 1 cup shredded pepper jack cheese until smooth. The cold cream helps prevent the cheese from melting prematurely. Add the chopped bacon pieces and toss to coat evenly in the cheese mixture.
Now, gradually add the cheese mixture to the dry ingredients, mixing gently with a wooden spoon or silicone spatula. You're looking for a soft dough that comes together when pressed—but don't overmix. If it feels too sticky, add 1-2 tablespoons of the reserved bacon fat. The dough should hold together when pressed but still be slightly crumbly.
🔥 Step 4: Build and Bake the Pull-Apart Masterpiece
Preheat your oven to 375°F. Lightly grease a 9x13-inch baking dish with the remaining bacon fat. Press about ⅓ of the dough into the bottom of the dish, forming an even layer. Sprinkle with ¼ cup of the reserved bacon fat (this creates that signature crispy top layer). Repeat with the remaining dough, creating 3 total layers, finishing with the last sprinkle of bacon fat.
Bake for 35-40 minutes until the top is deep golden brown and the edges are pulling away from the pan. Here's the pro tip: If the top browns too quickly, tent loosely with foil for the last 10 minutes to prevent burning while keeping the bottom crispy. The internal temperature should reach 180°F—this ensures the cheese is fully melted and the layers are tender.
⏰ Step 5: Rest and Serve for Maximum Shatter
Remove from the oven and let the pull-apart rest for 10 minutes before serving. This resting time is CRUCIAL—it allows the layers to set so they'll pull apart perfectly instead of falling apart. Use a sharp knife to cut through the layers if needed, but the real fun comes when you tear it apart by hand.
Serve warm with your favorite dipping sauce—whether it's marinara, ranch, or even extra bacon fat mixed with a little hot sauce. The contrast of crispy, cheesy layers with that smoky bacon flavor in every bite makes this dish irresistible. Leftovers? Reheat in 350°F oven for 10 minutes to restore that perfect texture!
Pro Tips For Making Bacon Cheese Pull Apart
- STOP MIXING DRY FIRST: Mix the heavy cream into the dry ingredients last—after cutting in the butter but before adding the bacon. I used to combine everything at once, and the dough turned gummy. The cream needs to be the final touch to bind everything smoothly, especially when you’re folding in crispy bacon bits.
- CUT BUTTER COLD (NOT FROZEN): Use unsalted butter straight from the fridge, cut into ½-inch cubes. If it’s too soft, chill the dough for 10 minutes before shaping—this prevents a dense, heavy pull-apart. I learned this after making a batch that tasted more like a sad biscuit than a flaky, pullable masterpiece.
- DON’T OVERWORK THE DOUGH: Once you fold in the bacon and cheese, handle the dough just enough to combine. Overmixing develops gluten, and your pull-apart will turn out tough instead of tender. Two gentle folds with a spatula is all it takes—no need to knead like you’re making bread.
- BAKE UNTIL GOLDEN, NOT JUST SET: Pull the dish out when the top is deep golden brown, not just pale with a few brown spots. The edges should be crisp, and the center should still feel slightly soft—it’ll finish cooking while resting. I used to pull it too soon, and the texture was more sad than spectacular.
Dietary considerations for this dish
Gluten-Free Adaptations
For a gluten-free version, swap the all-purpose flour for a 1:1 gluten-free baking flour blend like King Arthur Measure for Measure or Bob's Red Mill 1-to-1. You'll need 4 cups of the blend, plus 1 extra tablespoon of xanthan gum to mimic the binding properties of wheat flour.
Keep all other ingredients the same, but expect a slightly denser texture—this is normal! I've tested this with Cup4Cup and found it works beautifully, though the pull-apart might be slightly less crispy. 🌾
Dairy-Free Options
Skip the heavy cream and cheddar/pepper jack by using full-fat coconut milk (chilled overnight) and nutritional yeast mixed with dairy-free cheese shreds like Violife or Daiya. The coconut milk adds richness, while the nutritional yeast provides that umami depth.
For extra binding, add 1 extra tablespoon of ground flaxseed mixed with 3 tablespoons water to the wet ingredients. The texture will be slightly different but still delicious!
Lower-Carb Keto
Transform this into a keto-friendly dish by replacing the flour with almond flour (use 3 cups for a similar texture) and 1/4 cup psyllium husk powder for binding. Skip the heavy cream and use unsweetened almond milk instead.
For cheese, stick with sharp cheddar (it's lower in carbs than pepper jack) and reduce to 1.5 cups total. The result? A crispy, cheesy pull-apart with just 5g net carbs per serving (vs. 30g+ in the original). 💪
Vegetarian Swaps
Swap the bacon for crispy tempeh bacon (marinated in liquid smoke and soy sauce) or smoked tofu cut into strips and pan-fried until crispy. For extra flavor, add 1 tablespoon smoked paprika to the cheese mixture.
Use the same amount of tempeh or tofu as bacon (about 1.5 cups chopped), and reserve the pan drippings to grease the baking dish instead of bacon fat. The texture won't be identical, but it's a satisfying meat-free alternative!
Allergen-Friendly Notes
This recipe is naturally egg-free and nut-free (unless you add almond flour for keto). For soy-free versions, ensure your baking powder and butterflake seasoning are soy-free (check labels—Bob's Red Mill makes great soy-free options). If someone has a dairy allergy, the dairy-free swaps above work perfectly.
Always double-check ingredient labels, as cross-contamination can occur in shared facilities. When in doubt, I recommend Simple Mills or King Arthur for certified allergy-friendly products. ✨
Nutrition facts
Frequently asked questions
Can I make this bacon cheese pull-apart without heavy cream?
Replace the 1 cup heavy cream with 1 cup whole milk or even ½ cup melted butter plus ½ cup milk for a lighter texture. For extra richness, use ½ cup sour cream—it adds tanginess that pairs perfectly with the smoky bacon. The key is keeping everything cold to prevent the cheese from melting prematurely.
Why does my pull-apart turn out dense instead of crispy?
Overmixing the dough or using warm butter are the most common culprits. Keep all ingredients cold, mix just until combined, and avoid pressing too hard when building layers. Another trick: Spread the dough evenly in the pan—thick spots won't brown properly. If it still feels dense, try adding 1 extra tablespoon of baking powder next time.
How do I prevent the cheese from leaking out the sides?
Press the dough firmly into the corners of your 9x13-inch pan to create a seal, then chill the assembled dish for 20 minutes before baking. This helps the layers set before the cheese melts. For extra insurance, sprinkle ½ cup crushed cornflakes along the edges before adding the top layer—they'll crisp up and act as a barrier.
Can I make this ahead of time for a party?
Yes! Assemble the dish up to 24 hours ahead and refrigerate, covered. Bake straight from the fridge (add 5-10 minutes to the cooking time). For make-ahead genius, bake it, cool completely, then freeze. Reheat wrapped in foil at 350°F for 15 minutes—the texture stays perfect. Just avoid reheating uncovered to prevent drying.
What's the best way to reheat leftovers?
Wrap leftovers tightly in foil and reheat at 350°F for 10-12 minutes until golden and bubbly. For extra crispiness, broil for 1-2 minutes at the end. Microwaving works in a pinch (use 20-second bursts on medium power), but the texture suffers—this dish is best hot from the oven or reheated properly.